Master Depth of Field: A Complete DOF Calculator Workflow Guide
I’ve often looked at my early photos and wondered why they didn't look as sharp as I imagined. Perhaps the background was too busy, or the foreground was unexpectedly blurry. Many photographers rely on "guesswork" when it comes to focus, but I've learned that professional results come from a consistent DOF Calculator workflow.
Planning is the secret ingredient that separates a quick snapshot from a true masterpiece. By understanding how your lens and sensor interact, you can control exactly what is sharp and what is soft. In this guide, I will show you how to use a DOF calculator to take full control of your creative process from start to finish.
Whether you are shooting portraits with a creamy background or landscapes that need to be sharp from front to back, a systematic approach is essential. Let’s dive into how you can transform your photography by mastering the art of technical planning.

Pre-Visualization with DOF Calculator: Setting the Foundation for Success
The most important part of a photo shoot often happens before you even pick up your camera. Pre-visualization is the act of "seeing" the final image in your mind. Using an online tool allows you to turn that mental image into a technical reality long before you arrive on location.
Translating Creative Vision into Technical Parameters
Every creative choice has a technical requirement. If you want a "dreamy" look for a portrait, you know you need a shallow depth of field. But how shallow? Using a precision tool helps you decide if an f/1.8 aperture is enough, or if you need to step back to change the magnification.
When you input your camera model and focal length into a calculator, you get immediate feedback. You might discover that at a specific distance, your depth of field is only 2 centimeters wide. Knowing this helps you realize that if your subject moves slightly, they will be out of focus. This technical insight allows you to adjust your plan before you waste a single shot.
Using DOF Calculators for Remote Scouting
You don't always need to be at a location to plan your shoot. In my own workflow, I use maps and scouting apps to understand the layout of a scene. By combining these with a DOF calculator, you can predict how the environment will look through your lens.
For example, if you are shooting a mountain range behind a lake, you can calculate the hyperfocal distance. This tells you exactly where to focus to keep the flowers in the foreground and the peaks in the background sharp. Doing this math at home means you won't be fumbling with settings when the "golden hour" light is fading fast.
Building Technical Shot Lists
A shot list is more than just a list of subjects; it should be a technical roadmap. For a commercial project, you might need a variety of looks. One shot might require a deep depth of field to show a product in its environment, while another needs a blurred background to emphasize a detail.
By adding specific depth of field notes to your shot list, you ensure consistency. You can visualize your shots ahead of time and write down the exact aperture and distance settings needed for each look. This level of organization makes you more efficient and gives your clients confidence in your professional expertise.
On-Set DOF Adjustments: Adapting Your Plan to Reality
Even the best plans face challenges once you arrive on set. The light might change, the subject might move, or the space might be tighter than expected. This is where an active on-set adjustment strategy becomes vital to your success.
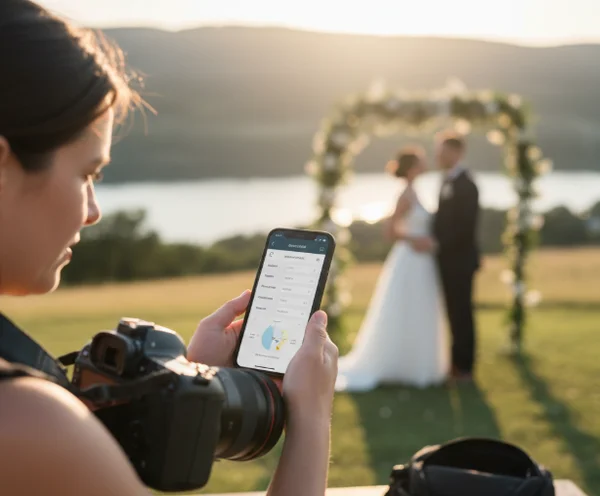
Quick Reference for Fast-Paced Shooting
In a fast-paced environment like a wedding or a fashion shoot, you don't have time for complex math. This is why having a mobile-friendly online calculator is a lifesaver. You can quickly check your parameters during a lens change or a location shift.
If you switch from a 35mm lens to an 85mm lens, your depth of field will shrink significantly. A quick glance at your calculated values tells you how much further you need to stand from your subject to maintain the same "look" or "feel" of the previous shots. This keeps the visual narrative of your project cohesive.
Troubleshooting Real-World Conditions
Sometimes, theory and reality clash. You might have planned to shoot at f/2.8, but the midday sun is too bright for your shutter speed. You are forced to stop down to f/5.6. How does this affect your background blur?
Instead of guessing, use a DOF simulator to see the new results. You might find that at f/5.6, the background becomes distracting. To fix this, the calculator might show that increasing your focal length or moving the subject further from the background will restore the look you wanted. Using data to solve these problems on the fly prevents frustration.
Improving Team Collaboration
If you are working with an assistant, a focus puller, or a second shooter, communication is key. Telling someone to "make the background blurry" is vague. Telling them the "total depth of field is 15 centimeters" is precise.
Sharing these technical details ensures that everyone is on the same page. When the entire team knows the hyperfocal distance and near-focus limits, mistakes become less frequent. This collaborative precision is what sets high-end production environments apart.
DOF Planning and Post-Processing: Extending Your Creative Control
I find that many photographers think the workflow ends when the shutter clicks. In reality, your planning decisions significantly impact what you can do in the editing room. A solid workflow starts in the field and carries through to the final export.
Informing Editing with Pre-Planned Data
When you know exactly which parts of your image are sharp, you can edit with more intent. If you planned a shallow depth of field, you might use masking in Lightroom to enhance the sharpness of the subject while slightly softening the background further.
By using a DOF calculator during your shoot, you know exactly where the focus naturally begins to fall. This knowledge allows your post-processing to appear natural and optical, rather than looking fake or over-processed. Your edits simply enhance the physics that you already mastered during the planning phase.
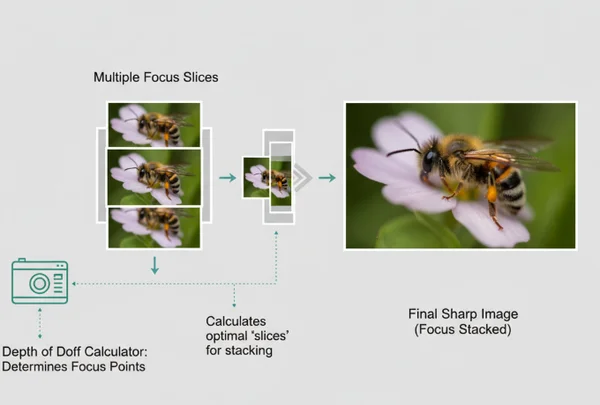
Precision Planning for Focus Stacking
Landscape and macro photographers often face a problem: even at a small aperture like f/16, they can't get everything sharp. This is where focus stacking becomes necessary. To do this correctly, you must know how many shots to take and where to focus for each one.
Using a precision tool, you can calculate the depth of field for each "slice" of your image. This ensures that the "far focus" of your first shot overlaps with the "near focus" of your second shot. Without this careful planning, you risk creating "soft gaps" in your final merged image. The result is a perfectly sharp image, from the front blade of grass to the furthest star.
Maintaining Consistency Across Series
For a series of photos—like a portrait gallery or a product catalog—consistency is everything. If one photo has a sharp nose and blurry ears, but the next photo has both sharp, the set will look messy.
Maintaining a strict DOF calculator workflow ensures that every image in your project shares the same optical characteristics. This level of detail is what makes a portfolio look professional and polished. It shows that you are in total control of your equipment and your craft.
Ready to Transform Your Photography?
True mastery of depth of field comes not from memorizing complex formulas, but from developing a systematic approach that puts you in control of every shot. Your photography journey evolves from initial planning through on-set adjustments to thoughtful post-processing. At each stage, data and precision guide your creative decisions.
When you stop guessing, your confidence grows, and your images improve immediately. Don't leave your focus to chance. Visit our homepage to start planning your next shoot with our intuitive tool. Use the power of physics to bring your creative vision to life today.
The Takeaway
How much time should I allocate for DOF planning before a shoot?
For a standard portrait or street session, even 5 minutes with a calculator can make a difference. For complex landscape or commercial work, you might spend 20 to 30 minutes scouting and calculating hyperfocal distances to ensure every shot is perfect.
What's the best way to reference DOF calculations during a shoot?
The most effective way is to use a mobile-friendly online tool on your smartphone. Many photographers also print out "DOF charts" for their specific lenses and keep them in their camera bags for quick reference when they don't have internet access.
How can I adjust my workflow when shooting conditions change unexpectedly?
If conditions change—such as moving from outdoors to indoors—re-input your new aperture and focal length into your planning tool. It will quickly show you how your "safe zone" of focus has changed, allowing you to adjust your subject's position or your own shooting distance accordingly.
Are there mobile apps that complement the DOF Calculator workflow?
Yes, while our web-based calculator is designed to work perfectly on mobile browsers, many photographers also use weather apps and sun-tracking apps. Combining light data with depth of field data gives you a complete picture of your upcoming shoot.
How does DOF planning affect my post-processing workflow?
Proper planning reduces the need for "fixing" focus issues in post. It allows you to use techniques like focus stacking more effectively because you have ensured that your source images have the necessary overlap. Essentially, good planning gives you higher-quality "raw materials" to work with during editing.