How to Get a Blurry Background with a DOF Calculator: Achieve Shallow Depth of Field in Portraits
Dream of those stunning portraits with creamy, blurred backgrounds that make your subject pop? Many photographers, especially those just starting, struggle to consistently achieve that professional look. You know the one—where the person is perfectly sharp, and the background melts away into a beautiful wash of color. The secret lies in mastering a concept called Depth of Field (DOF). So, how to get a blurry background reliably every single time?
This guide will unlock the secrets to creating beautiful bokeh and show you how a powerful tool can help you plan the perfect shot before you even press the shutter. By understanding a few key principles and using our intuitive DOF Calculator, you'll move from hoping for a blurry background to planning for it with absolute precision.
Understanding Shallow Depth of Field for Stunning Portraits
Before we touch the camera dials, let's grasp the core concept. The dreamy background blur you're aiming for is a direct result of something called a "shallow depth of field." When you master this, you gain incredible creative control over your images, especially in portrait photography.
What is Shallow Depth of Field & Why It Matters for Portraits?
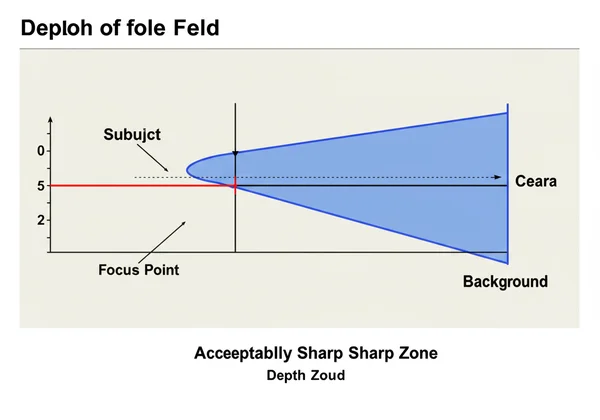
Depth of field refers to the range of distance in a photograph that appears acceptably sharp. Think of it as a slice of focus. Everything within that slice is sharp, while everything in front of it and behind it is out of focus.
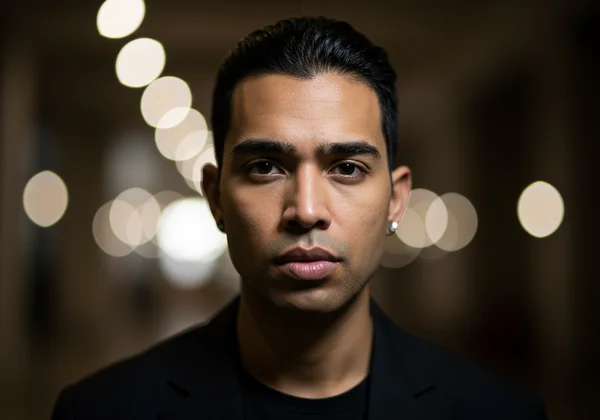
A "shallow" depth of field means this slice of focus is very thin. This is the effect we want for portraits. By having only a sliver of the scene in focus, you can place your subject within that sharp area and allow the distracting background elements (trees, buildings, other people) to blur into oblivion. This technique isolates your subject, draws the viewer's eye directly to them, and creates a powerful sense of depth and dimension.
The Magic of Bokeh: Creating Creamy Background Blur
You'll often hear the term "bokeh" used interchangeably with "blurry background," but there's a subtle difference. While a blurry background is the general effect, bokeh refers to the aesthetic quality of that blur. It describes how the lens renders out-of-focus points of light.
Good bokeh is often described as smooth, creamy, or soft, with light points appearing as pleasing circular orbs. Poor bokeh can look busy, harsh, or distracting. While the quality of bokeh is largely determined by your lens's design, controlling your depth of field is the first and most crucial step to revealing that beautiful effect.
Key Camera Settings Affecting Your Blurry Background
Achieving a shallow depth of field isn't random; it's a predictable outcome of three primary factors. By understanding and manipulating these settings, you can dial in the exact amount of background blur you want for any situation.
Aperture: Your Primary Control for Depth of Field
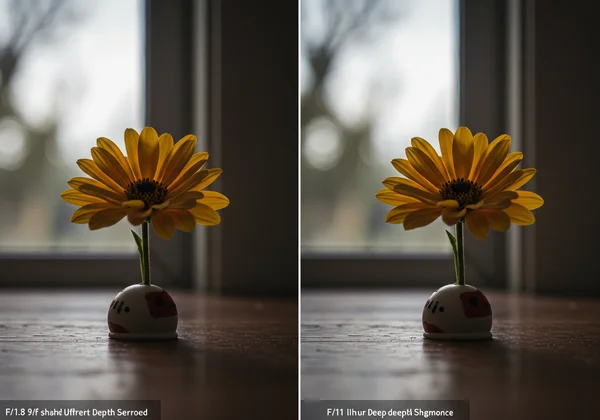
The aperture is the opening in your lens that lets light pass through to the camera sensor. It's measured in f-stops (e.g., f/1.8, f/4, f/11). Here’s the key rule to remember: a smaller f-stop number means a larger aperture opening, which results in a shallower depth of field and more background blur.
- Large Aperture (e.g., f/1.4, f/1.8, f/2.8): This lets in a lot of light and creates a very thin slice of focus. It's the go-to setting for creating that classic portrait look with a creamy, blurry background.
- Small Aperture (e.g., f/8, f/11, f/16): This lets in less light and creates a very deep slice of focus, keeping much more of the scene sharp. This is ideal for landscapes, not portraits.
Manipulating your aperture is the most direct way to control your depth of field. To see how different f-stops will impact your shot, you can use a dof simulator to visualize the effect instantly.
Focal Length: Magnifying the Blur in Your Lens
Focal length, measured in millimeters (mm), describes your lens's angle of view. A longer focal length (like 85mm, 135mm, or 200mm) has a "compressing" effect. It makes the background appear closer to the subject and significantly enhances the blur.
Think of it this way: a wide-angle lens (e.g., 24mm) captures a broad scene and tends to keep more of it in focus, resulting in a deep depth of field. A telephoto lens (e.g., 135mm) magnifies a small portion of the scene, and this magnification effect also applies to the out-of-focus areas, making the background blur appear much more intense, even at the same aperture setting. This is why classic portrait lenses are often in the 85mm to 135mm range.
Subject Distance: The Closer, The Blurrier Effect
The final piece of the puzzle is distance—specifically, the distance between your camera and your subject, and the distance between your subject and the background.
- Camera-to-Subject Distance: The closer you are to the person you're photographing, the shallower your depth of field will be. If you take a step closer to your subject, the background will become blurrier.
- Subject-to-Background Distance: The farther your subject is from the background, the more out of focus the background will become. If your subject is standing right in front of a brick wall, that wall will still be quite sharp. If you ask them to step 20 feet away from the wall, it will melt into a soft pattern.
Using the DOF Calculator to Plan Your Blurry Background Shots
Understanding the theory is one thing, but how do you apply it in the real world to get predictable results? This is where planning comes in. Instead of guessing your settings and hoping for the best, you can precisely calculate depth of field before you even pick up your camera.
Our online depth of field calculator is a powerful tool designed for this exact purpose. It takes the guesswork out of the equation, allowing you to simulate your settings and see the results instantly.
Step-by-Step: Inputting Parameters for Portrait Depth of Field
Let's walk through a typical portrait scenario. Imagine you want to take a head-and-shoulders shot with a beautifully blurred background.
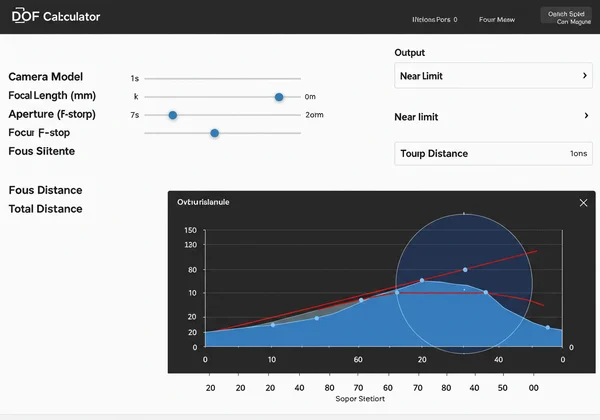
- Select Your Camera: In the "Camera Settings" on the left, choose your camera model from the dropdown. This automatically sets the correct sensor size and Circle of Confusion for accurate calculations.
- Enter Focal Length: Input the focal length of the lens you plan to use. Let's say you're using a classic 85mm portrait lens.
- Set Your Aperture: To get maximum blur, you'll want a wide aperture. Set the f-stop slider or type in a low number, like f/1.8.
- Define Focus Distance: Estimate how far you'll be from your subject. For a headshot, this might be around 6 feet (or about 2 meters).
The tool will instantly update on the right, showing you the exact depth of field. You'll see that at these settings, your total sharp area is only a few inches deep—perfect for getting the eyes sharp while the ears and background fall out of focus.
Visualize Your Depth of Field: See the Blur Before You Shoot
The most powerful feature of our tool is the "Depth of Field Visualization" chart at the bottom. It provides a simple, graphical representation of your focus area. The red line marks your focus point, and the blue shaded area shows the exact zone that will be acceptably sharp. This visual feedback is invaluable, helping you understand the relationship between settings in a way that numbers alone cannot. You can actually see how thin that slice of focus is and plan your photo's depth of field accordingly.
Real-World Scenarios: Applying Settings for Different Blur Intensities
The beauty of the calculator is its ability to let you experiment. What if you're taking a full-body portrait and need more than just the eyes in focus?
- Scenario: Full-Body Portrait. You might be 15 feet away. At 85mm and f/1.8, your depth of field is now much larger. Is it too large?
- Experiment: Try changing the aperture to f/2.8 or f/4 to see how the depth of field shrinks. Or, see what happens if you switch to a 135mm lens.
By using this tool, you can dial in the perfect balance of sharpness and blur for any creative vision before you even leave the house.
Master Your Portraits: Plan for Perfect Bokeh Every Time
Forget hoping for that perfect blurry background in your portraits; it's within your grasp through a blend of art and precision. By truly understanding and mastering aperture, focal length, and subject distance, you're not just taking pictures—you're crafting visual stories with intentional, breathtaking depth. Embrace this creative control and elevate your photography.
Ready to ditch the guesswork? Let our free online DOF Calculator be your secret weapon. Before your next portrait session, spend a few minutes experimenting with different settings, visualizing the precise blur and focus. Step into your shoot not just prepared, but excited and confident, knowing you're about to capture the exact, stunning vision you have in mind.
Ready to transform your portraits? Try our free tool today and see the difference for yourself.
Frequently Asked Questions About Blurry Backgrounds & Shallow DOF
What exactly is Depth of Field (DOF) in photography?
Depth of Field (DOF) is the zone of acceptable sharpness in a photo. It's the distance between the nearest and farthest objects that appear in focus. A shallow DOF means this zone is very small (ideal for portraits), while a deep DOF means a large zone is in focus (ideal for landscapes).
How does aperture size influence the background blur in my photos?
Aperture has an inverse relationship with background blur. A larger aperture opening (represented by a smaller f-stop number like f/1.8) creates a shallower depth of field, which results in more background blur. A smaller aperture (like f/11) creates a deeper depth of field, keeping more of the background in focus.
Can I achieve a blurry background with any camera lens?
While you can create some blur with almost any lens by getting very close to your subject, it's much easier with certain types. Lenses with a wide maximum aperture (f/2.8 or wider) and longer focal lengths (50mm and above) are best suited for creating significant background blur. These are often called "fast" lenses or "portrait" lenses.
What is the optimal focal length for portraits with shallow DOF?
The most popular focal lengths for portraits are between 85mm and 135mm on a full-frame camera. This range provides a flattering compression for facial features and makes it very easy to achieve a shallow depth of field, effectively separating the subject from the background. You can simulate different lenses with our camera simulator to see which you prefer.
Is "bokeh" the same thing as a "blurry background"?
They are related but not identical. "Blurry background" is the general effect created by a shallow depth of field. "Bokeh" refers to the artistic quality and smoothness of that blur, especially how the lens renders out-of-focus highlights. A good lens will produce pleasing, soft bokeh, enhancing the overall aesthetic of the portrait.