Focus Stacking Mastery: DOF Calculator for Macro & Landscape
Ever captured what you thought was the perfect macro shot, only to discover your subject isn't entirely sharp? Or perhaps you've stood before a breathtaking landscape, frustrated that your lens can't capture both the foreground flowers and distant mountains in perfect focus? You're not alone. Depth of field limitations plague photographers at every level.
What if you could pre-visualize exactly where to focus for perfect sharpness?
This is where focus stacking comes in—a technique professionals use to extend depth of field beyond what any single shot can achieve. The key to mastering it isn't just about software; it's about smart planning. Our powerful DOF Calculator is your essential planning partner in this process, turning guesswork into a precise, repeatable workflow.
This guide will walk you through everything you need to know about focus stacking for both macro and landscape photography, and how to use our tool to plan your shots like a pro.
Understanding Focus Stacking Fundamentals
Before diving into the "how," it's crucial to understand the "what" and "why." Focus stacking is a powerful technique, but it's not a magic bullet for every situation. Knowing the fundamentals ensures you use it effectively to create stunningly sharp images.
What is Focus Stacking and Why Photographers Need It
Focus stacking is a digital imaging technique that combines multiple photos, taken at different focus distances, into a single composite image. The result is a final photo with a greater depth of field (DOF) than any of the individual source images could provide on their own.
So, why is this necessary? Photography, especially in macro and landscape work, often involves trade-offs. A wide aperture like f/2.8 creates a beautiful blurred background but results in a very shallow focus plane. A narrow aperture like f/16 or f/22 increases depth of field but introduces diffraction, which softens the entire image and reduces overall sharpness. Focus stacking helps you bypass these limitations. It achieves maximum sharpness from front to back without diffraction's negative effects.
When to Use Focus Stacking vs. Single Shot Techniques
Deciding when to use focus stacking comes down to your creative intent and the limitations of your gear.
-
Use Focus Stacking When:
- Macro Photography: You need an entire small subject, like an insect or a piece of jewelry, to be perfectly sharp from its closest point to its farthest point. A single shot can rarely achieve this.
- Landscape Photography: You have a compelling foreground element very close to the lens (e.g., flowers) and want both it and the distant background (e.g., mountains) to be tack sharp.
- Product Photography: You need to show every detail of a product clearly, from front to back, for commercial purposes.
-
Use a Single Shot When:
- Creative Blur: You intentionally want a shallow depth of field to isolate a subject, like in portrait photography.
- Moving Subjects: Focus stacking requires a static scene. If your subject is moving, a single shot is your only option.
- Sufficient DOF: For many scenes, a single shot at a mid-range aperture (like f/8 or f/11) provides enough depth of field. Using a DOF simulator can help you determine if one shot is enough.
Technical Requirements for Successful Focus Stacking
While the concept is straightforward, successful execution requires a few key pieces of equipment and a stable setup.
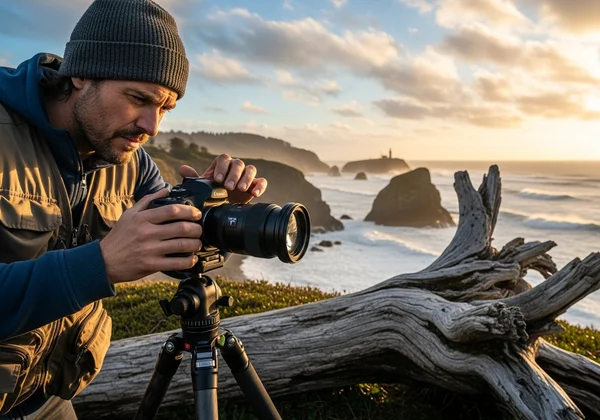
- A Sturdy Tripod: This is non-negotiable. The camera must remain perfectly still between shots to ensure the images align correctly in post-processing.
- A Camera with Manual Control: You need to set your focus, aperture, shutter speed, and ISO manually to ensure consistency across all frames.
- Remote Shutter or Timer: Pressing the shutter button can cause camera shake. A remote release or your camera's built-in 2-second timer eliminates this risk.
- Focus Stacking Software: You'll need software like Adobe Photoshop, Helicon Focus, or Affinity Photo to merge the individual images into the final composite.
With the basics covered, let's see how to transform your planning process from a guessing game to a precise science.
Planning Your Focus Stack with the DOF Calculator
The biggest challenge in focus stacking is knowing where to focus and how many shots you need. This is where our tool becomes indispensable. Instead of taking dozens of unnecessary photos, you can calculate the exact parameters required for a seamless blend.
Setting Up Parameters for Macro Photography
For macro photography, depth of field is incredibly shallow, often just millimeters deep. Precise planning is everything.
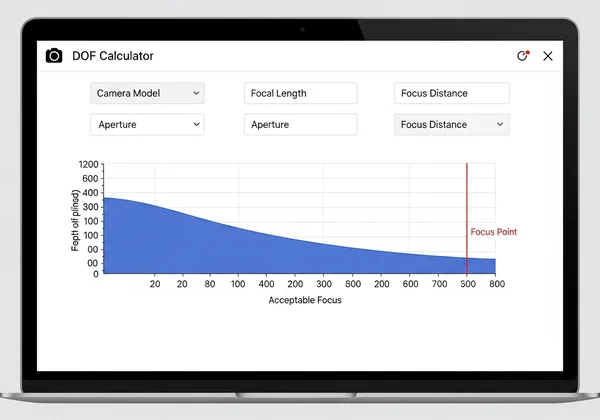
Start by entering your camera settings into the DOF Calculator.
- Select Your Camera: Choose your camera model from the dropdown. This automatically sets the correct Circle of Confusion, which is critical for accurate calculations.
- Enter Focal Length: Input the focal length of your macro lens (e.g., 100mm).
- Set Your Aperture: Choose the sharpest aperture for your lens, typically between f/8 and f/11, to avoid diffraction.
- Set Your Focus Distance: Input the distance to the closest part of your subject you want in focus. For macro, you will likely need to switch the units to centimeters or inches for better precision.
The calculator will instantly show you the near and far limits of your sharp focus for that single shot. This is your first "slice" of the focus stack.
Calculating Overlap Zones for Seamless Blending
To create a seamless final image, each "slice" of focus must slightly overlap with the next. The goal is seamless sharpness throughout. By understanding your depth of field limitations before shooting, you can create a systematic approach that guarantees perfect focus in your final image.
Here's how you use the tool to plan your shots:
- First Shot: Note the "Far Focus Limit" from your first calculation. This is the farthest point that will be sharp in your first photo.
- Second Shot: Your next focus point should be just inside that "Far Focus Limit." A good rule of thumb is to set your next focus distance at about 80% of the previous shot's total depth of field.
- Repeat: Adjust the "Focus Distance" in the calculator for your second shot. Note its new "Far Focus Limit." Repeat this process, "walking" your focus through the subject until the "Far Focus Limit" covers the rearmost part of your subject.
This method ensures you have enough overlap for your software to blend the images perfectly, without wasting time on redundant shots.
Visualizing Your Focus Plan with the Interactive Chart
The real power of our tool lies in its interactive visualization chart. As you adjust your focus distance, you'll see a blue bar representing your depth of field move along a timeline. The red line indicates your exact point of focus.
This visual feedback is incredibly intuitive. You can literally "see" each slice of your focus stack and how it relates to the others. For macro photographers, this means you can visualize the tiny slivers of focus and ensure they connect perfectly, guaranteeing your entire subject is covered. It transforms an abstract concept into a concrete, actionable plan you can take into the field.
Step-by-Step Focus Stacking Workflow for Macro
With your plan in hand, it's time to capture the images. Here is a practical, step-by-step workflow for a macro subject, like a flower.
Determining Optimal Aperture and Focus Points
As determined in the planning phase, set your camera to its optimal aperture (e.g., f/8). Mount your camera on the tripod and compose your shot. Use the focus points you calculated. Start by manually focusing on the very front tip of the flower petal. Take your first shot using a remote shutter.
Calculating Number of Shots Needed
Using the overlap method described earlier with our focus calculator, you will have already determined the number of shots required. For your second shot, carefully adjust the focus ring to move the focus point slightly deeper into the flower, to the point you planned. Take the second shot. Continue this process, taking a picture at each pre-calculated focus point, until you have captured the final shot focused on the back of the subject.
Focus Stacking Common Mistakes and Solutions
Even with careful planning, things can go wrong. Here are some common mistakes and how to fix them:
- Mistake: Focus Breathing. Some lenses change their field of view slightly as you adjust focus.
- Solution: Modern stacking software is very good at correcting this, but using a high-quality macro lens designed to minimize focus breathing is the best solution.
- Mistake: Inconsistent Lighting. A cloud passing overhead can change the light between shots, causing visible bands in the final image.
- Solution: Shoot on a calm day or use a diffuser to create consistent light. If shooting outdoors, work quickly.
- Mistake: Subject Movement. Wind can cause a flower to move, ruining the alignment.
- Solution: Use a plamp or a small shield to block the wind. Be patient and wait for still moments.
Extending Focus Stacking to Landscape Photography
The principles of focus stacking aren't just for tiny subjects. They are equally powerful for creating landscape images with breathtaking, front-to-back sharpness that a single exposure could never capture.
Using Hyperfocal Distance for Front-to-Back Sharpness
For many landscapes, a single shot using the hyperfocal distance is enough. The hyperfocal distance is the closest point at which you can focus while keeping objects at "infinity" acceptably sharp. Our tool includes a hyperfocal distance calculator that instantly tells you this point. By focusing there, you maximize your depth of field in a single frame.
However, when you have a foreground element extremely close to your lens, even the hyperfocal distance won't be enough to keep both the foreground and background sharp. This is where focus stacking for landscapes comes in.
Planning Focus Points for Multi-Plane Landscapes
The process is similar to macro but on a grander scale. Your "slices" of focus will be much larger.
- Foreground Shot: Frame your shot. Use the calculator to determine the settings for a shot focused on your closest foreground element (e.g., a rock 2 meters away).
- Midground Shot: Plan your next shot. You might focus on a tree 10 meters away.
- Background Shot: Finally, take a shot focused at or near infinity to ensure the distant mountains are perfectly sharp.
Often, only 2-3 shots are needed for a landscape focus stack, compared to the 10-50+ that might be required for a macro subject. You can try our free tool to see how different focus points create overlapping zones of sharpness.

Balancing Focus Stacking with Diffraction Concerns
As with macro, the primary reason to focus stack in landscapes is to avoid stopping down to f/22, where diffraction softens the image. By shooting 2-3 frames at your lens's sharpest aperture (e.g., f/11) and stacking them, you achieve superior sharpness across the entire scene compared to a single, diffraction-limited shot. This technique allows you to get the best of both worlds: incredible depth of field and maximum image quality.
Your Path to Perfect Focus Stacking
Focus stacking turns photographic challenges into creative opportunities. It's the technique that takes your images from good to great by extending what's possible with a single shot. By leveraging the precision of the DOF Calculator, you can move from guesswork to intentional planning, ensuring every shot in your stack contributes to a perfectly focused final image.
Whether you're documenting the delicate structures of a flower or capturing sweeping landscapes, the precision of focus stacking will help you create images that stand out. The key is to plan your focus points with confidence.
Ready to master focus stacking? Visit our DOF Calculator tool and start planning your perfectly sharp images today.
The Takeaway
What equipment do I need for focus stacking?
The absolute essentials are a camera with manual controls and a sturdy tripod. A remote shutter release is also highly recommended to prevent camera shake. For software, programs like Adobe Photoshop or Helicon Focus are needed to merge the images.
How does the DOF Calculator help reduce the number of shots needed?
The calculator helps by showing you the exact depth of field for each shot. This allows you to plan your focus points so that they overlap just enough, eliminating the need for extra, redundant shots. This saves time both in the field and in post-processing. Plan your shots with our depth of field calculator to see the difference.
Can focus stacking be done handheld?
While technically possible with modern cameras that have in-camera focus stacking (focus bracketing), it is extremely difficult and not recommended for high-quality results. A tripod is essential to ensure perfect alignment between frames, which is critical for a clean final image.
How do I calculate focus stacking intervals for macro photography?
The best way is to use a tool. After taking your first shot, note the "Far Focus Limit" provided by the DOF Calculator. For your next shot, set your focus point to be slightly before that limit. Repeating this process ensures a sufficient overlap for every frame.
What's the optimal aperture for focus stacking landscapes?
The optimal aperture is your lens's "sweet spot" for sharpness, which is typically between f/8 and f/11. Focus stacking allows you to use this sharpest aperture to capture multiple planes of focus, avoiding the image-softening diffraction that occurs at very narrow apertures like f/16 or f/22.