Depth of Field Calculator: Master Hyperfocal Distance for Landscape Focus
Have you ever returned from a breathtaking landscape expedition only to find your photos aren't sharp from the nearby flowers to the distant mountains? It's a common frustration for photographers at all levels. The secret to achieving that coveted edge-to-edge clarity lies in a powerful optical concept: hyperfocal distance. But how to get everything in focus photography? The answer is simpler than you think, especially when you have the right tool. By mastering this technique with a hyperfocal distance calculator, you can transform flat scenes into immersive, tack-sharp images that pull the viewer in.

This guide will demystify hyperfocal distance, showing you not just what it is, but how to precisely calculate and apply it using our intuitive online DOF calculator. Get ready to unlock the full potential of your lens and capture landscapes with professional-level sharpness.
What is Hyperfocal Distance, and Why is it Essential?
At its core, hyperfocal distance is the closest point at which you can focus your lens while keeping objects at infinity acceptably sharp. When you focus at this specific distance, your depth of field (the zone of sharpness in your image) extends from half the hyperfocal distance all the way to infinity. This makes it the ultimate cheat code for landscape, architectural, and any photographer aiming for maximum sharpness across the entire frame.
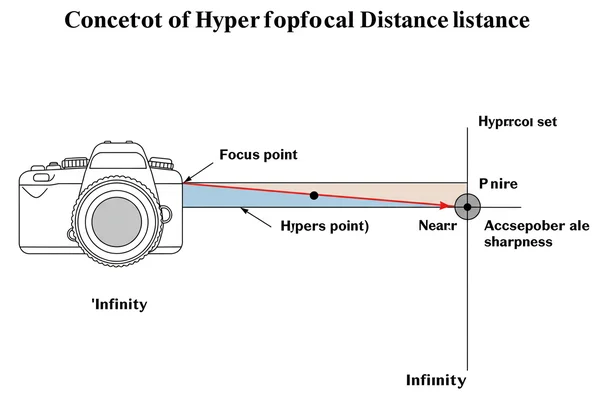
Instead of guessing where to focus—should it be the foreground rock or the distant peak?—the hyperfocal distance gives you a precise point. Focusing here guarantees the widest possible plane of focus, ensuring no critical element of your majestic scene is left soft or blurry. It’s the difference between a good snapshot and a breathtaking, professional photograph.
The Quest for Infinite Sharpness: Defining Deep Depth of Field
When we talk about getting everything in focus, we are referring to achieving a deep depth of field (also known as a large depth of field). This is the opposite of the popular "blurry background" or shallow depth of field effect used in portraiture. A deep depth of field ensures that elements in the foreground, middle ground, and background are all rendered with crisp detail.
Achieving this requires a careful balance of aperture, focal length, and focus point. While simply using a small aperture (like f/16 or f/22) helps, it's not the complete solution and can introduce softness from diffraction. The hyperfocal distance is the key that unlocks the maximum potential of your aperture setting, giving you the deepest possible depth of field for any given situation. By using a focus calculator, you take the guesswork out of the equation.
Beyond Blurry Backgrounds: Achieving Front-to-Back Clarity
Many photographers learn early on how to create a shallow depth of field to isolate a subject. But mastering front-to-back clarity is a more technically demanding skill that defines advanced photography. This is where the hyperfocal distance becomes your most valuable ally. It is a deliberate technique used to control focus with absolute precision.
Imagine a scene with vibrant wildflowers in the immediate foreground, a serene lake in the middle, and snow-capped mountains in the distance. To capture this scene's full glory, every element must be sharp. By calculating the hyperfocal distance, you can confidently set your focus and know that you have maximized the sharpness across the entire composition, from the nearest petal to the farthest peak.
How to Calculate Hyperfocal Distance with Our DOF Calculator
While the formulas behind hyperfocal distance can be complex, modern tools have made the process effortless. Our website provides a powerful and visual depth of field calculator that instantly gives you the data you need. You don't need to carry charts or do manual math in the field; all you need is a phone or computer to plan your shot.
The tool is designed for photographers of all levels. Whether you're a beginner like Alex trying to understand optical principles or a professional like Maria needing fast and accurate data for a commercial shoot, our calculator provides immediate and reliable results.
Understanding the Variables: Aperture, Focal Length, and Sensor Size
To get a precise hyperfocal distance calculation, you need to provide the calculator with three key pieces of information about your setup.
- Camera Sensor Size: The calculator has a preset list of popular camera models. Selecting your camera automatically sets the correct "Circle of Confusion," a critical factor for sharpness. If your camera isn't listed, you can manually input this value.
- Focal Length (mm): This is the focal length of your lens. A wider lens (e.g., 24mm) will have a much deeper natural depth of field and a closer hyperfocal distance than a telephoto lens (e.g., 200mm).
- Aperture (f-stop): This is the setting that controls how much light enters your lens. A smaller aperture (higher f-number like f/11 or f/16) is essential for achieving a deep depth of field and is a key variable in the calculation.
Step-by-Step: Using the Hyperfocal Distance Calculator for Your Shot
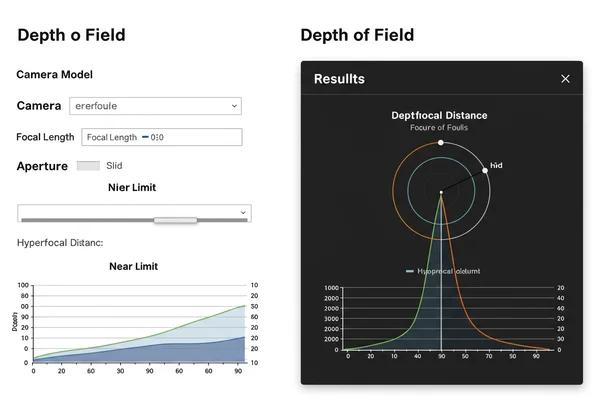
Calculating your hyperfocal distance on our platform is incredibly straightforward. The real-time results and visualization chart make understanding the data easier than ever.
- Navigate to the Calculator: Open the DOF Calculator on our homepage.
- Enter Your Camera Settings: On the left panel, select your camera model from the dropdown list. This automatically sets the correct sensor data.
- Input Your Lens and Aperture: Use the sliders or input boxes to set your lens's focal length (e.g., 24mm) and your desired aperture (e.g., f/11).
- Find the Hyperfocal Distance: Look at the "Depth of Field Results" on the right. The value labeled "Hyperfocal Distance" is the number you need. For example, it might say 2.5 meters.
- Visualize the Result: The visualization chart at the bottom shows your entire depth of field. When you focus at the hyperfocal distance, you'll see the far limit of your sharpness extend to infinity.
Interpreting the Results: Near Limit, Far Limit, and the Hyperfocal Point
Once the tool calculates the hyperfocal distance, it provides several key pieces of information. The most important is the Hyperfocal Distance itself—this is where you need to set your focus.
The results will also show you the "Near Focus Limit." This tells you the closest object to your camera that will be acceptably sharp. This is always half of the hyperfocal distance. So, if your hyperfocal distance is 2.5 meters, everything from 1.25 meters all the way to the horizon will be in focus. This allows you to compose your shot with confidence, knowing exactly where your zone of sharpness begins and ends. You can visualize your focus with our tool before you even take the shot.
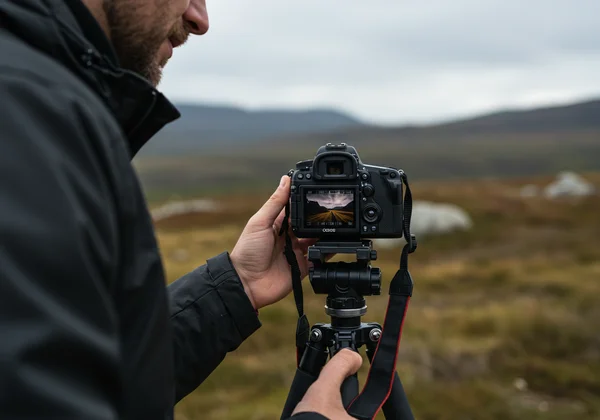
Applying Hyperfocal Distance for Breathtaking Landscape Photos
Knowing the number is only half the battle. The final step is applying it correctly in the field to capture that perfectly sharp image. This is where theory meets practice.
Once you have your hyperfocal distance from our online tool, you need to set your lens to focus at that exact distance. For example, if the calculator gives you a hyperfocal distance of 8 feet, you need to manually focus your lens on an object that is approximately 8 feet away from your camera.
Setting Your Focus Point for Optimal Sharpness in the Field
Many modern lenses don't have reliable distance scales. Here’s a practical way to set your focus:
-
Estimate the Distance: Use a tape measure for precision if possible, or learn to pace out distances. For 8 feet, that's about three large steps.
-
Use Live View: Switch your camera to Live View mode and magnify the view on your LCD screen.
-
Focus Manually: Place an object (like your camera bag or a rock) at the calculated hyperfocal distance. Manually adjust your lens's focus ring until that object is perfectly sharp on your magnified screen.
-
Compose and Shoot: Once focus is set, don't touch the focus ring again. Recompose your shot as desired and take the picture. The result will be an image with maximum sharpness from the near limit to infinity.
Beyond Landscapes: Other Uses for Deep Depth of Field
While hyperfocal distance is most famously associated with landscape photography, its application is much broader. Any scenario requiring extensive depth of field can benefit from this technique.
- Architectural Photography: Ensure an entire building, from its close facade details to its distant roofline, is perfectly sharp.
- Group Portraits: When photographing large groups arranged in multiple rows, calculating the hyperfocal distance ensures everyone, from the front row to the back, is in focus.
- Street Photography: For zone focusing, you can preset your focus to the hyperfocal distance for a given aperture, allowing you to capture fleeting moments instantly without worrying about autofocus.
Your Path to Sharper Images Starts Here
Unlock the full potential of your photography and say goodbye to blurry landscapes. Mastering hyperfocal distance isn't just a technical skill; it's a rite of passage that elevates your work from simple captures to carefully crafted images with stunning, intentional clarity. By removing the guesswork, you gain complete creative control over the sharpness of your photographs.
The era of complex calculations and confusing charts is over. With the intuitive and powerful DOF calculator, you can plan your shots with precision and confidence. The real-time visual feedback helps you not only get the numbers right but also truly understand the relationship between your settings and the final image.
Stop leaving sharpness to chance. Visit our homepage today, input your settings, and discover the power of precise focus planning. Your journey to capturing breathtaking, perfectly sharp images starts with a single calculation.
Common Questions About Hyperfocal Distance & Depth of Field
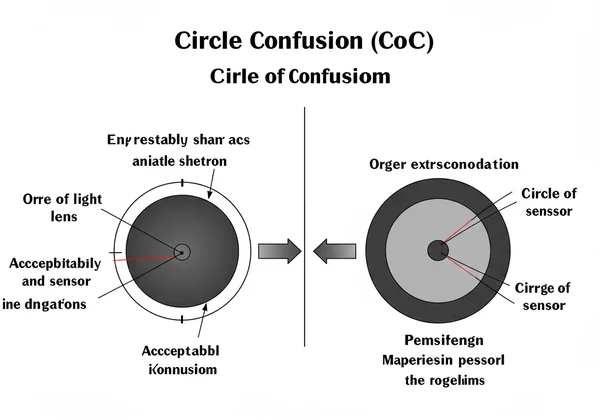
What is the Circle of Confusion's role in hyperfocal distance?
The Circle of Confusion (CoC) is a fundamental concept that defines what our eyes perceive as "acceptably sharp." It's the maximum size a point of light can be on the camera's sensor before we see it as a blurry circle instead of a sharp point. This value changes based on sensor size (a larger sensor has a larger CoC). Our calculator uses the correct CoC for your specific camera to ensure the hyperfocal distance calculation is accurate for your gear.
How does aperture specifically affect hyperfocal distance?
Aperture has a direct and significant impact. A smaller aperture (a higher f-stop number, like f/16) creates a deeper depth of field and brings the hyperfocal distance closer to the camera. Conversely, a wider aperture (a lower f-stop number, like f/2.8) results in a shallower depth of field, pushing the hyperfocal distance much farther away. You can see this relationship in real-time using our free calculator.
Is hyperfocal distance calculation still relevant with modern autofocus systems?
Absolutely. While modern autofocus is incredibly advanced, it doesn't know your artistic intent. An AF system might focus on the most prominent object in the foreground or a high-contrast area in the background, neither of which may be the optimal point for maximizing overall scene sharpness. Calculating and setting the hyperfocal distance manually ensures you are executing a specific strategy for achieving front-to-back clarity, giving you more control than any automatic system can offer.
Can I use a traditional depth of field chart instead of a calculator?
You can, but it's far less convenient and flexible. Depth of field charts are static and specific to one combination of camera sensor and focal length. If you use multiple lenses or cameras, you would need to carry a stack of different charts. An online tool like our DOF simulator is dynamic, allowing you to instantly calculate for any combination of gear and settings, making it a far more practical and efficient solution for the modern photographer.